
Because the only contact we have with the club is through our hands, the importance of holding the club correctly should not be underestimated. And yet, to stand any chance of a significant improvement in their game, a very high percentage of amateurs require adjustment in how they hold the club. Some of these changes are subtle but many are radical.
Positioning the hands in a ‘neutral position’ offers the best chance of consistently returning a ‘square’ clubface to the ball at impact. A grip ‘too weak’ will open the clubface resulting in a slice to the right whereas a grip ‘too strong’ results in a closed clubface and a hook to the left. Follow the instructions below to check your grip and see if you are placing your hands on the golf club correctly.
(I have written this article for right-handers to make it easier to understand – sorry left-handers, you will just have to reverse the process accordingly but the same theory applies).
– It’s very important to unite the hands when gripping the club – weakening your more dominant right hand by removing one of its fingers from contacting the club serves to stop this dominant hand from overpowering your left.
The two most common holds which enable us to do this are the ‘interlocking’ or ‘overlapping’ grips.
– When assuming your grip, ALWAYS position your left hand first – If your left hand is incorrectly placed, your right hand will have zero chance of occupying the correct position.
(See pic 1)
– You will see that I have drawn a black dot onto my left hand and have placed a white dot directly 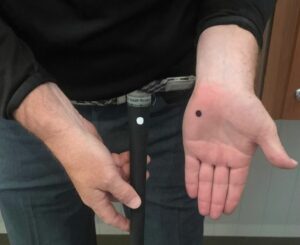 on top of the grip itself – I want you to marry these two dots up – this will position the fleshy pad of your left hand (below your little finger and above your left wrist) onto the top part of the grip.
After doing this, simply close the fingers of your left hand onto the grip. Check that your thumb sits on top of the grip but is fractionally to the right of centre as you look down. You should be able to see no more and no less than 2 knuckles on the back of your left hand.
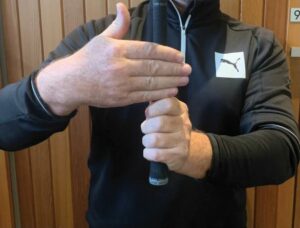
At this point you can check that your left hand is positioned correctly by doing the following: (pic 2)
• Hold the club out in front of you so that the shaft is parallel to the ground.
• Apart from your index, release all fingers from contacting the grip including your thumb.
• You should be able to support the weight of the club without the clubhead dropping to the floor – Its weight will be supported by the index finger and fleshy pad of your left hand. If it falls, it will likely mean that you have positioned your left hand on the grip ‘too-far’ to the left of centre.
Once you’ve achieved this positioning correctly, it is time to position your right hand onto the club  and unite both hands together with your chosen ‘interlocking’ or ‘overlapping’ grip.
With your left hand, angle your wrist to lift the shaft from a position parallel to the ground to being vertical.
• Open the fingers of your right hand and align the back of the grip across the middle pads of your four fingers (pic 3)
• Slide your right hand towards the left until the little finger of your right hand and index finger of the left are touching (pic 4)
• If adopting the overlapping grip, release the little finger of your right hand and slide your hand further until the third finger of your right hand touches the index of your left. Now close your right hand onto the grip. The slightly curved fleshy pad beneath your right thumb will fit like a jigsaw piece on top of your left thumb. As you close your fingers, the bottom 3 fingers of your right hand will contact the grip and your little finger will rest atop of the groove created between the third finger and index finger of your left hand (Pic 5)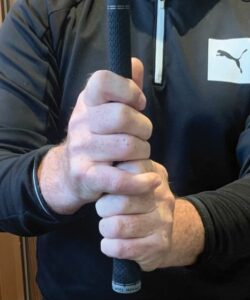
• Your right thumb should sit fractionally to the right of centre of the top of the grip.
For the interlocking grip, the process is similar. When the little finger of your right hand touches the index of the left – release both of these fingers from the grip and interlock them before closing them onto the grip. Your third finger of your right hand will rest against the index of your left and your little finger will be ‘intertwined’ between the third finger of your left hand and your index finger. The curved fleshy pad below your right thumb should again sit on top of your left thumb.
 Because the golf ball is struck from a position out in front of us, it’s important to have our arms hang in the same position that they do when hanging either side of your torso. In (pic 6) I have released all fingers from a correct hold of the club and they are pointing towards the ground. From here you should be able to bring your arms back to rest against your torso without having to pronate or supinate them. If you can’t do this, it is a sign that your hand positioning on the club is incorrect.