

The Chalkline Drill
If you don’t already own one, head to your local hardware store and purchase a chalk/string line – preferably one with blue or white chalk. The one photographed in this article cost me a grand total of $8.00!!
Allow me to explain why it’s a fantastic investment …
Very rarely do I witness amateur golfers investing hours of

practice to improve their putting. Most will only gift themselves a three or four minute knock around on the putting green prior to teeing off.
Putting styles can be very personalised, but there are certain fundamentals that must be in place for success on the greens to remain consistent. Without a trained-eye watching you practice, it’s difficult to know if you are practising correctly or are further ingraining poor technique.
The following drill is an old one – I take no credit for it as it was shown to me a long time a
go. I did however ‘tweak’ it slightly shortly after having been shown it. Doing so increased my ability to hole putts under pressure. I don’t suggest doing the ‘GOAL’ part of this drill before you play though as you may end up missing your tee-off time (I’ll explain later)
You will need (Pic 1): Your putter, a chalk line, 4 balls and a squeezable bottle of water.
1. Head to the putting green and take some time to find a ‘dead-straight’ putt of no less than 6 feet.
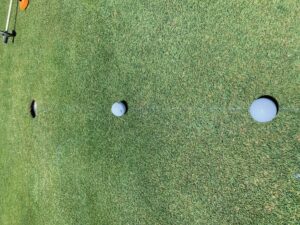
2. Mark your Chalkline for the length of that putt so that the straight line produced on the greens surface goes into the dead centre of the cup. (Pic 2)
3. Place the 4 golf balls down directly onto the chalk line (each of them a foot apart beg
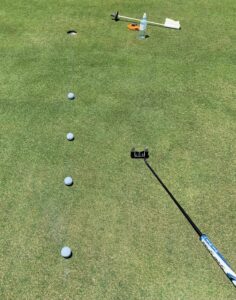
inning with 3 feet to the final one at 6 foot). (Pic 3)
4. When placing the balls down onto the chalk line, do so carefully – the ball should be dissected into two equal halves by the chalk line.
5. Take your set-up putting position to the 3 foot putt. When you look down at the ball, your eyes should be positioned directly over the ball. Your chalk line will help you to see if this is so.
6. Ensure that the face of your putter is at 90 degrees to the hole (for this pre-determined straight putt) – an open face would impart clockwise spin and miss to the right whilst a closed clubface would impart anti-clockwise spin resulting in a miss to the left.
7. Now, simply make your putting stroke – a miss will highlight that you have done something incorrectly during the movement to have delivered a clubface back to the ball different to the one at set-up. The fault could be one or a combination of a number of things – from chest rotation, excessive head movement

, overactive wrists etc. Repetition of this drill will help you to highlight any faults in your action and eradicate them. (Pic 4)
8. After holing the first putt (3 feet) work back to the next putt (4 feet) and so on until you have holed 4 consecutive putts.
9. If at any time you miss one – you absolutely MUST start again from a zero count by replacing all four balls to their starting position.
Setting your personal GOAL
Set your ‘own target’ of how many times you have to hole-out all four balls in a row before you allow yourself to leave the putting green – you MUST stay true to yourself in that, if you miss any putt you begin the practice drill again from a ZERO count. DO NOT LEAVE THE PUTTING GREEN UNTIL YOU HAVE ACHIEVED YOUR GOAL.
I suggest starting at 3 rounds of 4 putts = (12 consecutive putts along that straight line) The pressu

re to hole them builds as you move towards that magic number of 12.
If I haven’t practiced for a while, I set myself a target of 4 sets without a miss.
Repetition of this practice drill will train your eyes to see a straight putt – it will impro
ve your set-up position and putting stroke as well as increase your ability to make a smooth consistent stroke under pressure.
After completing the drill – grab the squeezable bottle of water and blast the chalk line clean (pic 5) – The sprinklers will likely dissolve it when they next come on but it will keep the Head green keeper off your back!